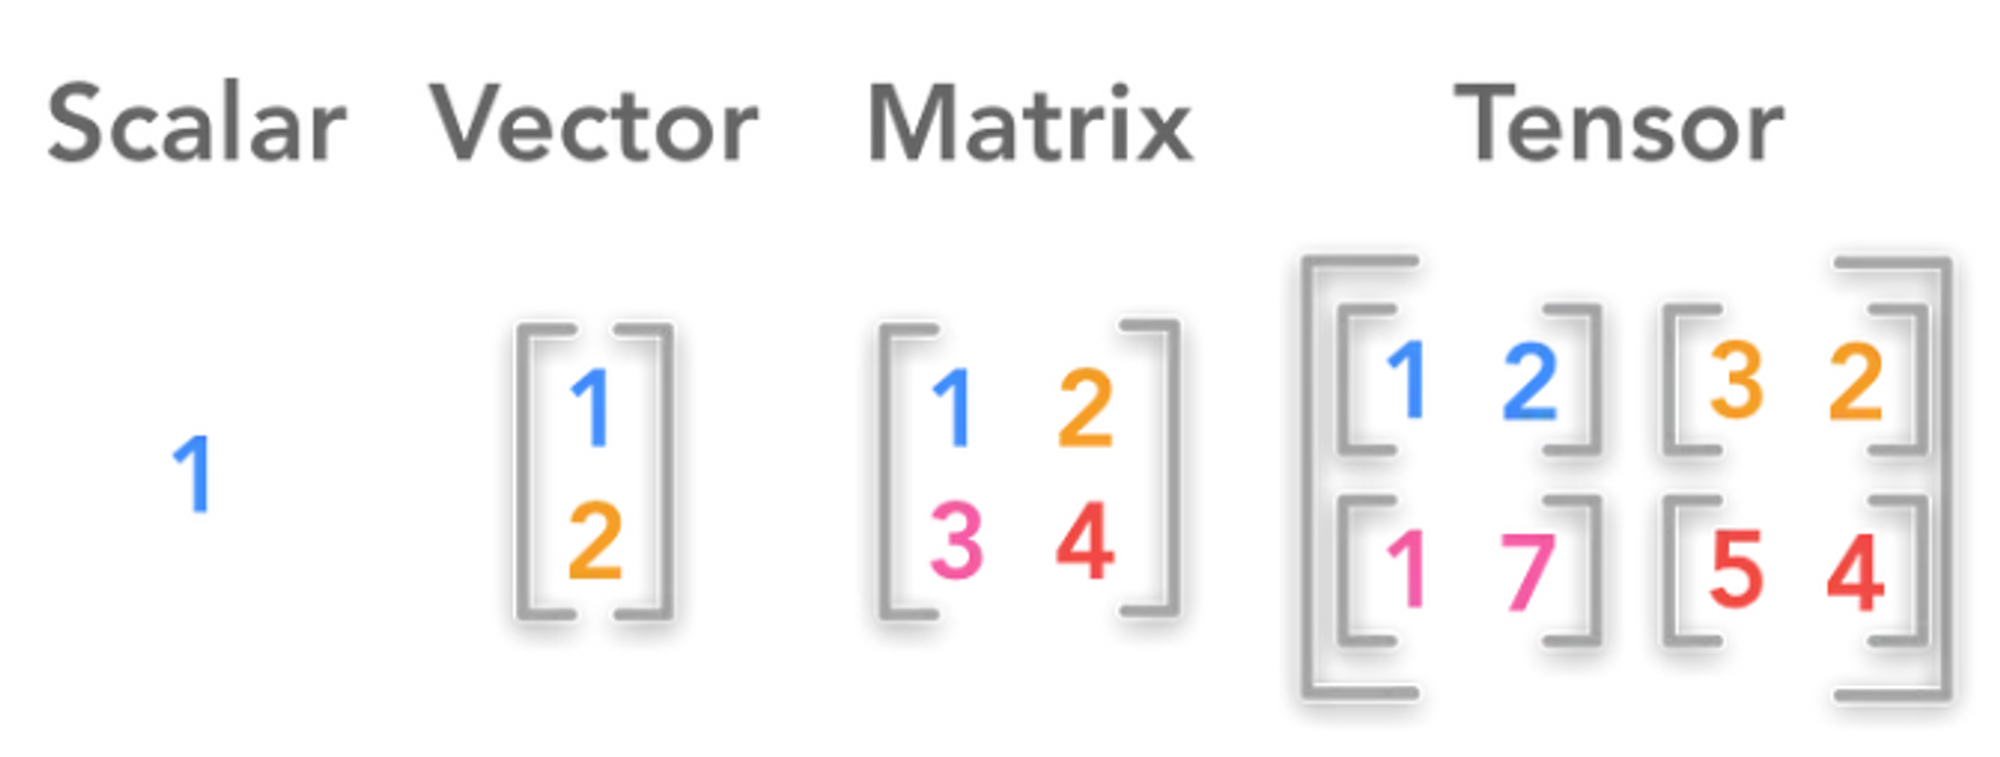
텐서(Tensor)
행렬을 2차원 배열이라 표현한다면, 텐서는 그 이상의 배열이라고 표현할 수 있다.
PyTorch에서는 텐서를 사용하여 모델의 입력과 출력뿐만 아니라 모델의 매개변수를 부호화(encode) 한다. GPU나 다른 연산 가속을 위한 특수한 하드웨어에서 실행할 수 있다는 점을 제외하면, 텐서는 NumPy의 ndarray와 매우 유사하다. 즉, 텐서는 GPU를 사용하기 위해서 필요하다.
텐서 초기화
텐서는 여러가지 방법으로 초기화 할 수 있다.
- 데이터로부터 직접 생성
- NumPy 배열로 부터 생성
- 다른 텐서로부터 생성
- 무작위 또는 상수 값을 사용하여 생성
import torch
import numpy as np

# 1. 직접 생성
data = [[1,2],[3,4]]
x_data = torch.tensor(data)

# 2. NumPy로 생성
np_array = np.array(data)
x_np = torch.from_numpy(np_array)

# 3. 다른 텐서로부터 생성
x_ones = torch.ones_like(x_data) # x_data의 속성을 유지합니다.
print(f"Ones Tensor: \\n {x_ones} \\n")

x_rand = torch.rand_like(x_data, dtype=torch.float) # x_data의 속성을 덮어씁니다.
print(f"Random Tensor: \\n {x_rand} \\n")
💡 Out:
Ones Tensor:
 tensor([[1, 1],
        [1, 1]])

Random Tensor:
 tensor([[0.4281, 0.0805],
        [0.1475, 0.9391]])
# 4. 무작위 또는 상수 값 사용
shape = (2, 3,)
rand_tensor = torch.rand(shape)
ones_tensor = torch.ones(shape)
zeros_tensor = torch.zeros(shape)

print(f"Random Tensor: \\n {rand_tensor} \\n")
print(f"Ones Tensor: \\n {ones_tensor} \\n")
print(f"Zeros Tensor: \\n {zeros_tensor}")
💡 Out:
Random Tensor:
 tensor([[0.5357, 0.8288, 0.9360],
        [0.0173, 0.7522, 0.0664]])

Ones Tensor:
 tensor([[1., 1., 1.],
        [1., 1., 1.]])

Zeros Tensor:
 tensor([[0., 0., 0.],
        [0., 0., 0.]])
Torch.tensor와 Torch.Tensor의 차이점
기본 예제에서는 torch.Tensor를 지속적으로 사용했는데, PyTorch의 공식 document에서 텐서를 생성할 때에는 torch.tensor로 사용하여 이 차이점에 대해서 알아보았다.
- torch.tensor
- 함수
- int 입력시 int로 사용
- 데이터를 인풋으로 받음
- 입력받은 데이터를 새로운 메모리 공간에 복사하여 텐서 생성
- torch.Tensor
- 클래스
- int 입력시 float로 변환
- 데이터 입력 시 메모리 공간 그대로 사용
- 데이터 입력 시 입력받은 값 복사하여 텐서 생성
import torch

# torch.tensor 예시
a = torch.tensor([1, 2, 3])
print(a)  # tensor([1, 2, 3])

# torch.Tensor 예시
b = torch.Tensor(3)
b.fill_(1)
print(b)  # tensor([1., 1., 1.])
a는 리스트를 받아서 텐서로 반들기 때문에 a의 dtype과 device는 리스트의 특성과 같이 ‘int64’와 ‘CPU’ 가 된다. b는 빈 텐서를 먼저 생성하고 fill_() 메서드를 사용하여 모든 원소를 1로 채웠지만 Tensor로 생성하여 dtype과 device는 ‘float32’와 ‘CPU’ 가 된다. (* b를 1로 채우기 전에는 랜덤 값이 3개 들어간 텐서 생성)
텐서의 속성 (Attribute)
텐서의 속성은 텐서의 shape, datatype 및 어느 장치에 저장되는지를 나타낸다.
tensor = torch.rand(3, 4)

print(f"Shape of tensor: {tensor.shape}")
print(f"Datatype of tensor: {tensor.dtype}")
print(f"Device tensor is stored on: {tensor.device}")
💡 Out:
Shape of tensor: torch.Size([3, 4])
Datatype of tensor: torch.float32
Device tensor is stored on: cpu
텐서의 연산 (Operation)
수 많은 텐서의 연산을 확인할 수 있는 곳 : https://pytorch.org/docs/stable/torch.html
대부분의 텐서의 연산은 NumPy와 비슷하다.
tensor = torch.ones(4, 4)
tensor[:,1] = 0
print(tensor)
💡 Out:
tensor([[1., 0., 1., 1.],
        [1., 0., 1., 1.],
        [1., 0., 1., 1.],
        [1., 0., 1., 1.]])
t1 = torch.cat([tensor, tensor, tensor], dim=1)
print(t1)
💡 Out:
tensor([[1., 0., 1., 1., 1., 0., 1., 1., 1., 0., 1., 1.],
        [1., 0., 1., 1., 1., 0., 1., 1., 1., 0., 1., 1.],
        [1., 0., 1., 1., 1., 0., 1., 1., 1., 0., 1., 1.],
        [1., 0., 1., 1., 1., 0., 1., 1., 1., 0., 1., 1.]])
# 요소별 곱(element-wise product)을 계산합니다
print(f"tensor.mul(tensor) \\n {tensor.mul(tensor)} \\n")
# 다른 문법:
print(f"tensor * tensor \\n {tensor * tensor}")
💡 Out:
tensor.mul(tensor)
 tensor([[1., 0., 1., 1.],
        [1., 0., 1., 1.],
        [1., 0., 1., 1.],
        [1., 0., 1., 1.]])

tensor * tensor
 tensor([[1., 0., 1., 1.],
        [1., 0., 1., 1.],
        [1., 0., 1., 1.],
        [1., 0., 1., 1.]])
print(f"tensor.matmul(tensor.T) \\n {tensor.matmul(tensor.T)} \\n")
# 다른 문법:
print(f"tensor @ tensor.T \\n {tensor @ tensor.T}")
💡 Out:
tensor.matmul(tensor.T)
 tensor([[3., 3., 3., 3.],
        [3., 3., 3., 3.],
        [3., 3., 3., 3.],
        [3., 3., 3., 3.]])

tensor @ tensor.T
 tensor([[3., 3., 3., 3.],
        [3., 3., 3., 3.],
        [3., 3., 3., 3.],
        [3., 3., 3., 3.]])
print(tensor, "\\n")
tensor.add_(5)
print(tensor)
💡 Out:
tensor([[1., 0., 1., 1.],
        [1., 0., 1., 1.],
        [1., 0., 1., 1.],
        [1., 0., 1., 1.]])

tensor([[6., 5., 6., 6.],
        [6., 5., 6., 6.],
        [6., 5., 6., 6.],
        [6., 5., 6., 6.]])
출처 :
PyTorch 튜토리얼
https://tutorials.pytorch.kr/beginner/blitz/tensor_tutorial.html
tensor와 Tensor의 차이
'AI > 파이썬' 카테고리의 다른 글
| coco-dataset 다운로드 오류 (0) | 2023.08.07 |
|---|---|
| 파이토치(PyTorch) - Data Sets & Data Loaders (0) | 2023.06.27 |
| Rejection Sampling을 통한 Beta 분포 확률변수 생성 (0) | 2023.06.08 |
| 파이썬(Python) - Iterator 사용하기 (0) | 2023.05.30 |
| 파이토치(PyTorch) 설치 (0) | 2023.05.08 |

댓글